Email with Postfix, Dovecot, and MySQL on CentOS 6
Traducciones al EspañolEstamos traduciendo nuestros guías y tutoriales al Español. Es posible que usted esté viendo una traducción generada automáticamente. Estamos trabajando con traductores profesionales para verificar las traducciones de nuestro sitio web. Este proyecto es un trabajo en curso.
DeprecatedThis guide has been deprecated and is no longer being maintained.


The Postfix Mail Transfer Agent (MTA) is a high performance open source e-mail server system. This guide will help you get Postfix running on your CentOS 6 Linode, using Dovecot for IMAP/POP3 service, and MySQL to store information on virtual domains and users.
Before You Begin
Prior to using this guide, be sure you have followed the Setting Up and Securing a Compute Instance and set your hostname.
root, or use su - root to log in as root. Certain commands below cannot be run as sudo and must be run as root.Install Required Packages
Install any outstanding package updates:
yum updateThe version of Postfix included in the main CentOS repository does not include support for MySQL; therefore, you will need install Postfix from the CentOS Plus repository. Before doing so, add exclusions to the
[base]and[updates]repositories for the Postfix package to prevent it from being overwritten with updates that do not have MySQL support:- File: /etc/yum.repos.d/CentOS-Base.repo
1 2 3 4 5 6 7 8[base] name=CentOS-$releasever - Base exclude=postfix # released updates [updates] name=CentOS-$releasever - Updates exclude=postfix
Install the required packages:
yum --enablerepo=centosplus install postfix
yum install dovecot mysql-server dovecot-mysql
This installs the Postfix mail server, the MySQL database server, the Dovecot IMAP and POP daemons, and several supporting packages that provide services related to authentication.
Next, set up a MySQL database to handle virtual domains and users.
Set up MySQL for Virtual Domains and Users
Configure MySQL to start on boot, then start MySQL:
chkconfig mysqld on
service mysqld start
Run
mysql_secure_installation. You will be presented with the opportunity to change the MySQL root password, remove anonymous user accounts, disable root logins outside of localhost, remove test databases, and reload privilege tables. It is recommended that you answer yes to these options:mysql_secure_installationStart the MySQL shell:
mysql -u root -pCreate a database for your mail server and switch to it:
CREATE DATABASE mail;
USE mail;
Create a mail administration user called
mail_adminand grant it permissions on themaildatabase. Please be sure to replacemail_admin_passwordwith a strong password:GRANT SELECT, INSERT, UPDATE, DELETE ON mail.* TO 'mail_admin'@'localhost' IDENTIFIED BY 'mail_admin_password'; GRANT SELECT, INSERT, UPDATE, DELETE ON mail.* TO 'mail_admin'@'localhost.localdomain' IDENTIFIED BY 'mail_admin_password'; FLUSH PRIVILEGES;Create the virtual domains table:
CREATE TABLE domains (domain varchar(50) NOT NULL, PRIMARY KEY (domain) );Create a table to handle mail forwarding:
CREATE TABLE forwardings (source varchar(80) NOT NULL, destination TEXT NOT NULL, PRIMARY KEY (source) );Create the users table:
CREATE TABLE users (email varchar(80) NOT NULL, password varchar(20) NOT NULL, PRIMARY KEY (email) );Create a transports table:
CREATE TABLE transport ( domain varchar(128) NOT NULL default '', transport varchar(128) NOT NULL default '', UNIQUE KEY domain (domain) );Exit the MySQL shell:
quitBind MySQL to localhost (127.0.0.1) by editing
/etc/my.cnf, and adding the following to the[mysqld]section of the file:- File: /etc/my.cnf
1bind-address=127.0.0.1
This is required for Postfix to be able to communicate with the database server. If you have MySQL set up to listen on another IP address (such as an internal IP), you will need to substitute this IP address in place of
127.0.0.1during the Postfix configuration steps. It is not advisable to run MySQL on a publicly-accessible IP address.Restart the database server:
service mysqld restart
Next, perform additional Postfix configuration to set up communication with the database.
Configure Postfix to work with MySQL
mail_admin_password with the mail_admin password input earlier.Create a virtual domain configuration file for Postfix called
/etc/postfix/mysql-virtual_domains.cf:- File: /etc/postfix/mysql-virtual_domains.cf
1
2
3
4
5
user = mail_admin password = mail_admin_password dbname = mail query = SELECT domain AS virtual FROM domains WHERE domain='%s' hosts = 127.0.0.1
Create a virtual forwarding file for Postfix called
/etc/postfix/mysql-virtual_forwardings.cf:- File: /etc/postfix/mysql-virtual_forwardings.cf
1
2
3
4
5
user = mail_admin password = mail_admin_password dbname = mail query = SELECT destination FROM forwardings WHERE source='%s' hosts = 127.0.0.1
Create a virtual mailbox configuration file for Postfix called
/etc/postfix/mysql-virtual_mailboxes.cf:- File: /etc/postfix/mysql-virtual_mailboxes.cf
1
2
3
4
5
user = mail_admin password = mail_admin_password dbname = mail query = SELECT CONCAT(SUBSTRING_INDEX(email,<'@'>,-1),'/',SUBSTRING_INDEX(email,<'@'>,1),'/') FROM users WHERE email='%s' hosts = 127.0.0.1
Create a virtual email mapping file for Postfix called
/etc/postfix/mysql-virtual_email2email.cf:- File: /etc/postfix/mysql-virtual_email2email.cf
1
2
3
4
5
user = mail_admin password = mail_admin_password dbname = mail query = SELECT email FROM users WHERE email='%s' hosts = 127.0.0.1
Set proper permissions and ownership for these configuration files:
chmod o= /etc/postfix/mysql-virtual_*.cf
chgrp postfix /etc/postfix/mysql-virtual_*.cf
Create a user and group for mail handling. All virtual mailboxes will be stored under this user’s home directory:
groupadd -g 5000 vmail
useradd -g vmail -u 5000 vmail -d /home/vmail -m
Complete the remaining steps required for Postfix configuration. Please be sure to replace
server.example.comwith the Linode’s fully qualified domain name. If you are planning on using your own SSL certificate and key, replace/etc/pki/dovecot/private/dovecot.pemwith the appropriate path:postconf -e 'myhostname = server.example.com' postconf -e 'mydestination = $myhostname, localhost, localhost.localdomain' postconf -e 'mynetworks = 127.0.0.0/8' postconf -e 'inet_interfaces = all' postconf -e 'message_size_limit = 30720000' postconf -e 'virtual_alias_domains =' postconf -e 'virtual_alias_maps = proxy:mysql:/etc/postfix/mysql-virtual_forwardings.cf, mysql:/etc/postfix/mysql-virtual_email2email.cf' postconf -e 'virtual_mailbox_domains = proxy:mysql:/etc/postfix/mysql-virtual_domains.cf' postconf -e 'virtual_mailbox_maps = proxy:mysql:/etc/postfix/mysql-virtual_mailboxes.cf' postconf -e 'virtual_mailbox_base = /home/vmail' postconf -e 'virtual_uid_maps = static:5000' postconf -e 'virtual_gid_maps = static:5000' postconf -e 'smtpd_sasl_type = dovecot' postconf -e 'smtpd_sasl_path = private/auth' postconf -e 'smtpd_sasl_auth_enable = yes' postconf -e 'broken_sasl_auth_clients = yes' postconf -e 'smtpd_sasl_authenticated_header = yes' postconf -e 'smtpd_recipient_restrictions = permit_mynetworks, permit_sasl_authenticated, reject_unauth_destination' postconf -e 'smtpd_use_tls = yes' postconf -e 'smtpd_tls_cert_file = </etc/pki/dovecot/certs/dovecot.pem' postconf -e 'smtpd_tls_key_file = </etc/pki/dovecot/private/dovecot.pem' postconf -e 'virtual_create_maildirsize = yes' postconf -e 'virtual_maildir_extended = yes' postconf -e 'proxy_read_maps = $local_recipient_maps $mydestination $virtual_alias_maps $virtual_alias_domains $virtual_mailbox_maps $virtual_mailbox_domains $relay_recipient_maps $relay_domains $canonical_maps $sender_canonical_maps $recipient_canonical_maps $relocated_maps $transport_maps $mynetworks $virtual_mailbox_limit_maps' postconf -e 'virtual_transport = dovecot' postconf -e 'dovecot_destination_recipient_limit = 1'Edit the file
/etc/postfix/master.cfand add the Dovecot service to the bottom of the file:- File: /etc/postfix/master.cf
1
2
dovecot unix - n n - - pipe flags=DRhu user=vmail:vmail argv=/usr/libexec/dovecot/deliver -f ${sender} -d ${recipient}
Configure Postfix to start on boot and start the service for the first time:
chkconfig postfix on
service postfix start
This completes the configuration for Postfix.
Configure Dovecot
Move
/etc/dovecot/dovecot.confto a backup file:mv /etc/dovecot/dovecot.conf /etc/dovecot/dovecot.conf-backupCopy the following into the now-empty
dovecot.conffile, substituting your system’s domain name forexample.comin line 37:- File: /etc/dovecot/dovecot.conf
 1
 2
 3
 4
 5
 6
 7
 8
 9
10
11
12
13
14
15
16
17
18
19
20
21
22
23
24
25
26
27
28
29
30
31
32
33
34
35
36
37
38
39
40
41
42
43
44
45
46
47
48
49
50
51
52
protocols = imap pop3 log_timestamp = "%Y-%m-%d %H:%M:%S " mail_location = maildir:/home/vmail/%d/%n/Maildir ssl_cert = </etc/pki/dovecot/certs/dovecot.pem ssl_key = </etc/pki/dovecot/private/dovecot.pem namespace { type = private separator = . prefix = INBOX. inbox = yes } service auth { unix_listener auth-master { mode = 0600 user = vmail } unix_listener /var/spool/postfix/private/auth { mode = 0666 user = postfix group = postfix } user = root } service auth-worker { user = root } protocol lda { log_path = /home/vmail/dovecot-deliver.log auth_socket_path = /var/run/dovecot/auth-master postmaster_address = postmaster@example.com } protocol pop3 { pop3_uidl_format = %08Xu%08Xv } passdb { driver = sql args = /etc/dovecot/dovecot-sql.conf.ext } userdb { driver = static args = uid=5000 gid=5000 home=/home/vmail/%d/%n allow_all_users=yes }
MySQL will be used to store password information, so
/etc/dovecot/dovecot-sql.conf.extmust be created. Insert the following contents into the file, making sure to replacemail_admin_passwordwith your mail password:- File: /etc/dovecot/dovecot-sql.conf.ext
1
2
3
4
driver = mysql connect = host=127.0.0.1 dbname=mail user=mail_admin password=mail_admin_password default_pass_scheme = CRYPT password_query = SELECT email as user, password FROM users WHERE email='%u';
Restrict access to the file by changing the permissions to allow users in the
dovecotgroup to access it, while denying access to others:chgrp dovecot /etc/dovecot/dovecot-sql.conf.ext chmod o= /etc/dovecot/dovecot-sql.conf.extConfigure Dovecot to start on boot, and start it for the first time:
chkconfig dovecot on
service dovecot start
Check
/var/log/maillogto make sure Dovecot started without errors. Your log should have lines similar to the following:- File: /var/log/maillog
1
2
3
Mar 18 15:21:59 sothoryos postfix/postfix-script[3069]: starting the Postfix mail system Mar 18 15:22:00 sothoryos postfix/master[3070]: daemon started -- version 2.6.6, configuration /etc/postfix Mar 18 15:32:03 sothoryos dovecot: master: Dovecot v2.0.9 starting up (core dumps disabled)
Test your POP3 server to make sure it’s running properly:
yum install telnet
telnet localhost pop3
The terminal should output results similar to the following:
Trying 127.0.0.1...
Connected to localhost.localdomain.
Escape character is '^]'.
+OK Dovecot ready.
Enter the command
quitto return to your shell. This completes the Dovecot configuration. Next, you’ll make sure aliases are configured properly.
Configure Mail Aliases
Edit the file
/etc/aliases, making sure thepostmasterandrootdirectives are set properly for your organization:- File: /etc/aliases
1
2
postmaster: root root: postmaster@example.com
Update aliases and restart Postfix:
newaliases
service postfix restart
This completes alias configuration. Next, test Postfix to make sure it’s operating properly.
Testing Postfix
Test Postfix for SMTP-AUTH and TLS:
telnet localhost 25While still connected, issue the following command:
ehlo localhostYou should see output similar to the following:
250-hostname.example.com
250-PIPELINING
250-SIZE 30720000
250-VRFY
250-ETRN
250-STARTTLS
250-AUTH PLAIN
250-AUTH=PLAIN
250-ENHANCEDSTATUSCODES
250-8BITMIME
250 DSN
Issue the command
quitto terminate the telnet connection.
Next, populate the MySQL database with domains and email users.
Set Up and Test Domains and Users
In the following example, the MySQL shell is used to add support for the domain “example.com”, which will have an email account called “sales”.
Log into the MySQL shell:
mysql -u root -pSwitch to the
maildatabase, add support for your domain, and create an email account. Be sure to replaceexample.comwith your domain name,sales@example.comwith your chosen email, andpasswordwith a strong password:USE mail; INSERT INTO domains (domain) VALUES ('example.com'); INSERT INTO users (email, password) VALUES ('sales@example.com', ENCRYPT('password')); quitPrior to accessing any newly-created email account, a test message needs to be sent to create that user’s mailbox:
yum install mailx
mailx sales@example.com
Press
Ctrl+Dto complete the message. You can safely leave the field forCc:blank. This completes the configuration for a new domain and email user.
@ sign) is not sufficient for authentication. When email users authenticate to the server, they must supply the entire email address created above as their username.Check Your Logs
After the test mail is sent, check the mail logs to make sure the mail was delivered.
Check the
mailloglocated in/var/log/maillog. You should see something similar to the following:- File: /var/log/maillog
1
2
3
4
Mar 18 15:39:07 server postfix/cleanup[3252]: 444E34055: message-id=<20150318153907.444E34055@server.example.com> Mar 18 15:39:07 server postfix/qmgr[3218]: 444E34055: from=<root@server.example.com>, size=489, nrcpt=1 (queue active) Mar 18 15:39:07 server postfix/pipe[3258]: 444E34055: to=<sales@example.com>, relay=dovecot, delay=0.09, delays=0.04/0.01/0/0.05, dsn=2.0.0, sta$ Mar 18 15:39:07 server postfix/qmgr[3218]: 444E34055: removed
Check the Dovecot delivery log located in
/home/vmail/dovecot-deliver.log. The contents should look similar to the following:- File: /home/vmail/dovecot-deliver.log
1deliver(<sales@example.com>): 2011-01-21 20:03:19 Info: msgid=\<<20110121200319.E1D148908@hostname.example.com>>: saved mail to INBOX
Now you can test to see what the users of your email server would see with their email clients.
Test the Mailbox
To test the
sales@example.commailbox, navigate to the mailbox directory/home/vmail/example.com/sales/Maildirand issue the following command:cd /home/vmail/example.com/sales/Maildir findYou should see output similar to the following:
.
./dovecot-uidlist
./cur
./new
./new/1285609582.P6115Q0M368794.li172-137
./dovecot.index
./dovecot.index.log
./tmp
Test the mailbox by using a mail client. For this test, using mutt is recommended. If it is not installed by default, install it with
yum install mutt, then run:mutt -f .You may be prompted to create the root mailbox. This is not required.
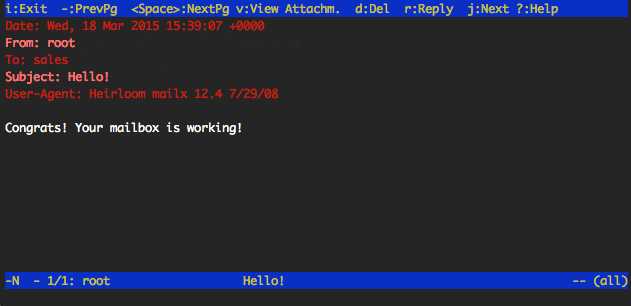
If there is an email in the inbox, Postfix, Dovecot, and MySQL have been successfully configured! To quit mutt press
q.
More Information
You may wish to consult the following resources for additional information on this topic. While these are provided in the hope that they will be useful, please note that we cannot vouch for the accuracy or timeliness of externally hosted materials.
This page was originally published on

